long rotation phone from acorn on Vimeo.
Showing posts with label 2011. Show all posts
Showing posts with label 2011. Show all posts
21.10.11
17.10.11
new work
More...
a clay rotation and another high res- one.
This project appears to be drawing to a close.
a clay rotation and another high res- one.
This project appears to be drawing to a close.
Clay render loop from acorn on Vimeo.
stuff to mention.. another time, I'll post the other render too then.
2.10.11


lots to talk about, some progress; about the setup I mentioned in the previous post, here is a texture decal render.

The concept is to have two or three planes orthogonal to their respective face on the object to model. In this way you can place reference images on the planes as a texture. You can then orbit around the object with the reference images and align them much easier.

these images are the imported obj mesh, this seems to be a good format for the export/import scenario. It seems to be a very common format ( I think it is a 'lightwave' obj). Regardless it seems to be common.

Aside from that, we have, at the top of the post, images of the base mesh (un-sub-dee'd). Five of them.
All and all coming along well...
29.9.11
from scratch

more work.... started from scratch again.
Rather than use the rotoscope method I used crossing planes ( will post later).
Anyway, I got better results for the holes and such but I am still getting errors.


More to mention but I am tired.
26.9.11
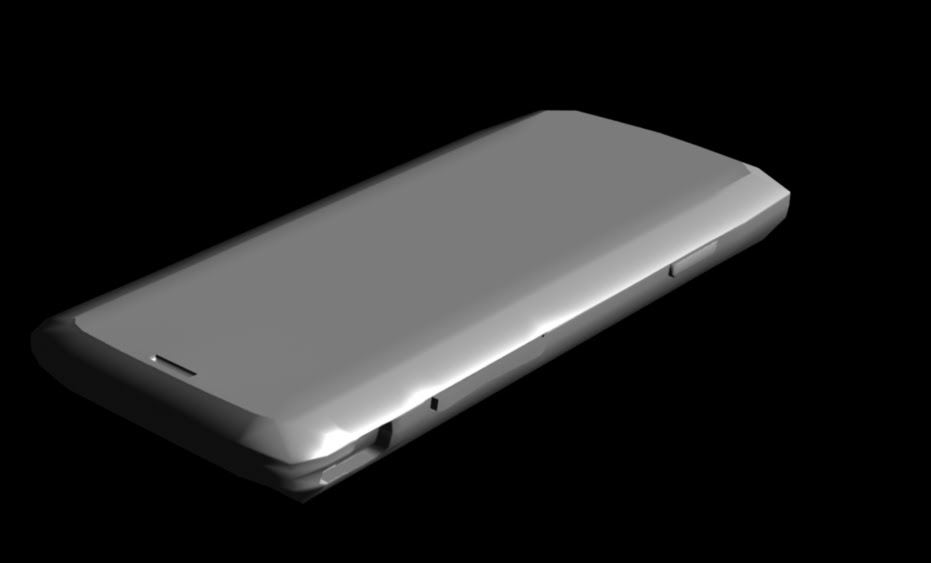
~progress?
 continuing with the revamped phone, I've gotten further with this one than the previous one although there are some issues with rounding that I don't want. I have watched a video of someone
modeling a phone where they controlled the 'tightness' of the edges with additional edges. This is what I have been trying to do. BUT; they where working in MAX and this is softimage.

I think that in softimage, it is preferable to use hard
edges with "mark hard edges", but I want to

export this to various formats for turbosquid...
so I am trying to make the model as simple and portable as possible.
23.9.11
some rough materials
 UPDATE
...................................................................................................................

did some more cleanup and refinement of the mesh, working out the kinks of measuring in real-->3d, used an image to get the primary size and shape and now measuring (with a vernier caliper) to get the size of the phone.
The silver trim is made with a incidence in the shiny port of a modified phong shader (preset manager - a grey plastic). The black plastic on the bottom is made with the same material I used for the buttons. I modeled the ridges in the middle button,
 rather than try to do them with a texture/bump map, although I think I will do that for the rest of the rough/textured surfaces on the phone.
20.9.11


19.9.11
cell phone --current
 more work on my current cell phone, getting better
This took me about today to build...
I struggled with the holes and hard edged deformations. This is at Geometry Approximation; render level 2, no automatic discontinuity*. I read in the manual that it is more efficient. Not sure why but, to me, it seems obvious that if its always smooth it will be better.
7.8.11
back to the vestibule
I've been working on the octagon room again, getting closer to finishing- much better at working with final gathering. Recently worked on the wood for the room.
a plank with the wood that I've been working on,

Looking at it as just a plank, I think it still needs some work, but in the room it was getting there.

The doors and moldings have supports and projections
Many things in this room are coming together... as I'm having some realizations about working on it. One thing I should mention is freezing the final gathering map ( the setting 'Only use FG points from file') under Map Settings. This allows you to render much faster. So I was under the delusion that I could apply the wood texture without a projection/support, and spent alot of time getting the wood to look right. Finally I put on a projection and support and the wood looked alot better. I was reluctant because of all the texture supports I would have in the scene, it would be messy.
I have yet to get into the details of the doors and put separate supports for the cross pieces as opposed to the vertical.
I have to say, the FG-Phys.Sun/Sky-PhotoExposure-arch_material combination is great lighting.
...
22.3.11
some stuff -- getting more prof. look

some work on the cell phone using new ideas/techiniques.
added name bitmap to the improved phone. The improvements have yet to be finalized by welding together so there is a clear seam. Altogether though I feel better about this process.
21.2.11
PHYMATEUS wing...

Before and after shots, rather, beginning and close to end-
painted in GIMP, using paths to make the streaks or bands. Really like the way it came out, the image on the right is for comparison.

I then layered blue underneath for the contrasting stripes.

the next challenge is to get the stippling right; the subtle degradation of yellow into blue/green.
You can see the green wash in the above image that is the start of that coloration but I'm not sure how to achieve the look on the grasshopper.
19.2.11
PHYMATEUS nymph
Some progress on the grasshopper, a rotation
rendered in HD
some progress on the painting of the textures

rendered in HD
some progress on the painting of the textures

21.10.10
more pictures (building) improvement

The image above is the result of a couple of days of fiddling with the settings on the scene, right now I am rendering a new one with some changes.
:: above image, some of the settings I adjusted are; the power of the physical sky multiplier which, due to the kobayashi pluggin, is connected via an expression to the multiplier of the physical sun. I am using the architectural shaders for almost all of the surfaces in the scene; I adjusted the ray multiplier of the concrete which is on the ceiling and the floor, as well as much adjustment on the windows: the reflectivity, the reflectivity color, the cutout opacity but so far have avoided using my own settings for BDRF. I have repeatedly adjusted the spots to get them where I want them, they should be very week in comparison to the sun I think. All and all this experience is crying for more reading on the subject.::
- The biggest hurdle seems to be to get the windows on the left to look like the windows on the right. They are at different angles so the reflectivity is different. It looks to me like the windows on the right aren't even there.
- The color of the exterior environment is off, it should be blue sky and brown ground.... not sure what to do there, because the sky/sun is set very low.
- The "cans" in the ceiling are not lit by the spot which sit inside them
 The image to the left is the most recent render, the cans are slightly brighter and the spots are more diffuse.
16.10.10
Back to the cell phone
 I returned to a project that I have worked on multiple times in the past, each time I think I improve... I might finish this time.
 Render: Image preview, soft 2011, 3 lights (2 point, 1 infinte) ambient occlusion on the phong ambient port ( main body) and lambert ambient port ( lens backdrop)
for reference::
post on si-community.com
http://www.si-community.com/community/viewtopic.php?f=24&t=496&p=6800&e=6800
Subscribe to:
Posts (Atom)